
One press to print everything, notes on every repair, and an estimate that knows what’s paid
It has been two weeks since the last note, and a lot has shipped. Most of it came from the counter: shops telling us where the day slows down, and us taking the clicks out.
The headline is printing. One shop prints two receipts, two ticket slips and five labels for every check-in, and was spending around twenty-five clicks a ticket doing it. Now it is one press. Close behind are work notes, so the customer and the next tech know exactly what was done on each line, and a front counter that checks the customer’s details and shows what is paid before any money changes hands.
Further down: partial refunds, customer updates that send themselves, pickup and delivery times your customers can choose, and a handful of smaller things worth knowing about.
Settings → Integrations → PrintNode · Settings → Printing → Automatic printing
Every receipt, ticket and label, printed with one press
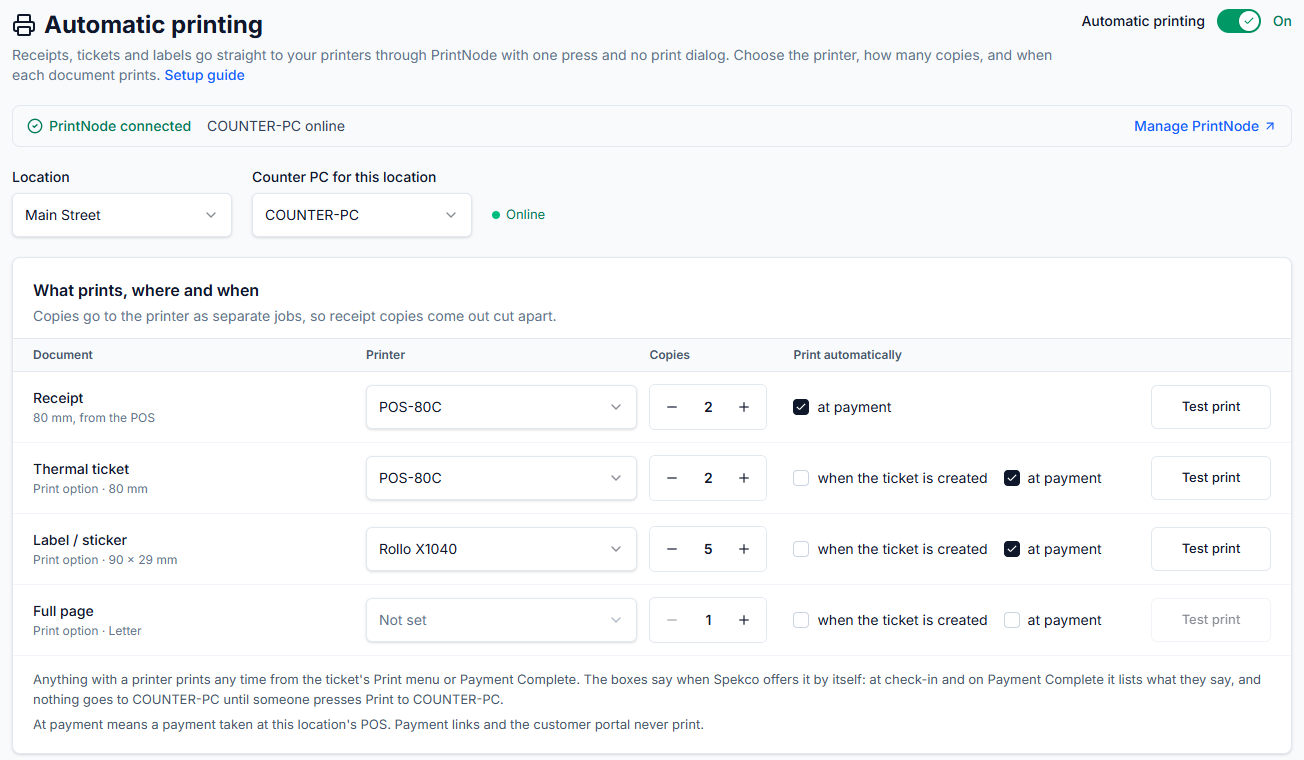
A web page can’t pick a printer or skip the print dialog, so printing a check-in used to mean a dialog per document and a printer choice in each one. Automatic printing goes around the browser. Spekco sends each document straight to your counter PC through PrintNode, a small app that runs on the PC your printers are connected to, by USB or over the network.
Under Settings → Printing → Automatic printing you choose, for each location, which PC prints. Then, for each document — receipt, thermal ticket, label, full page — you choose the printer, how many copies, and when Spekco offers it: when the ticket is created, at payment, or both. Copies go as separate jobs, so two receipts come out cut apart. Test print checks each printer from the same page.
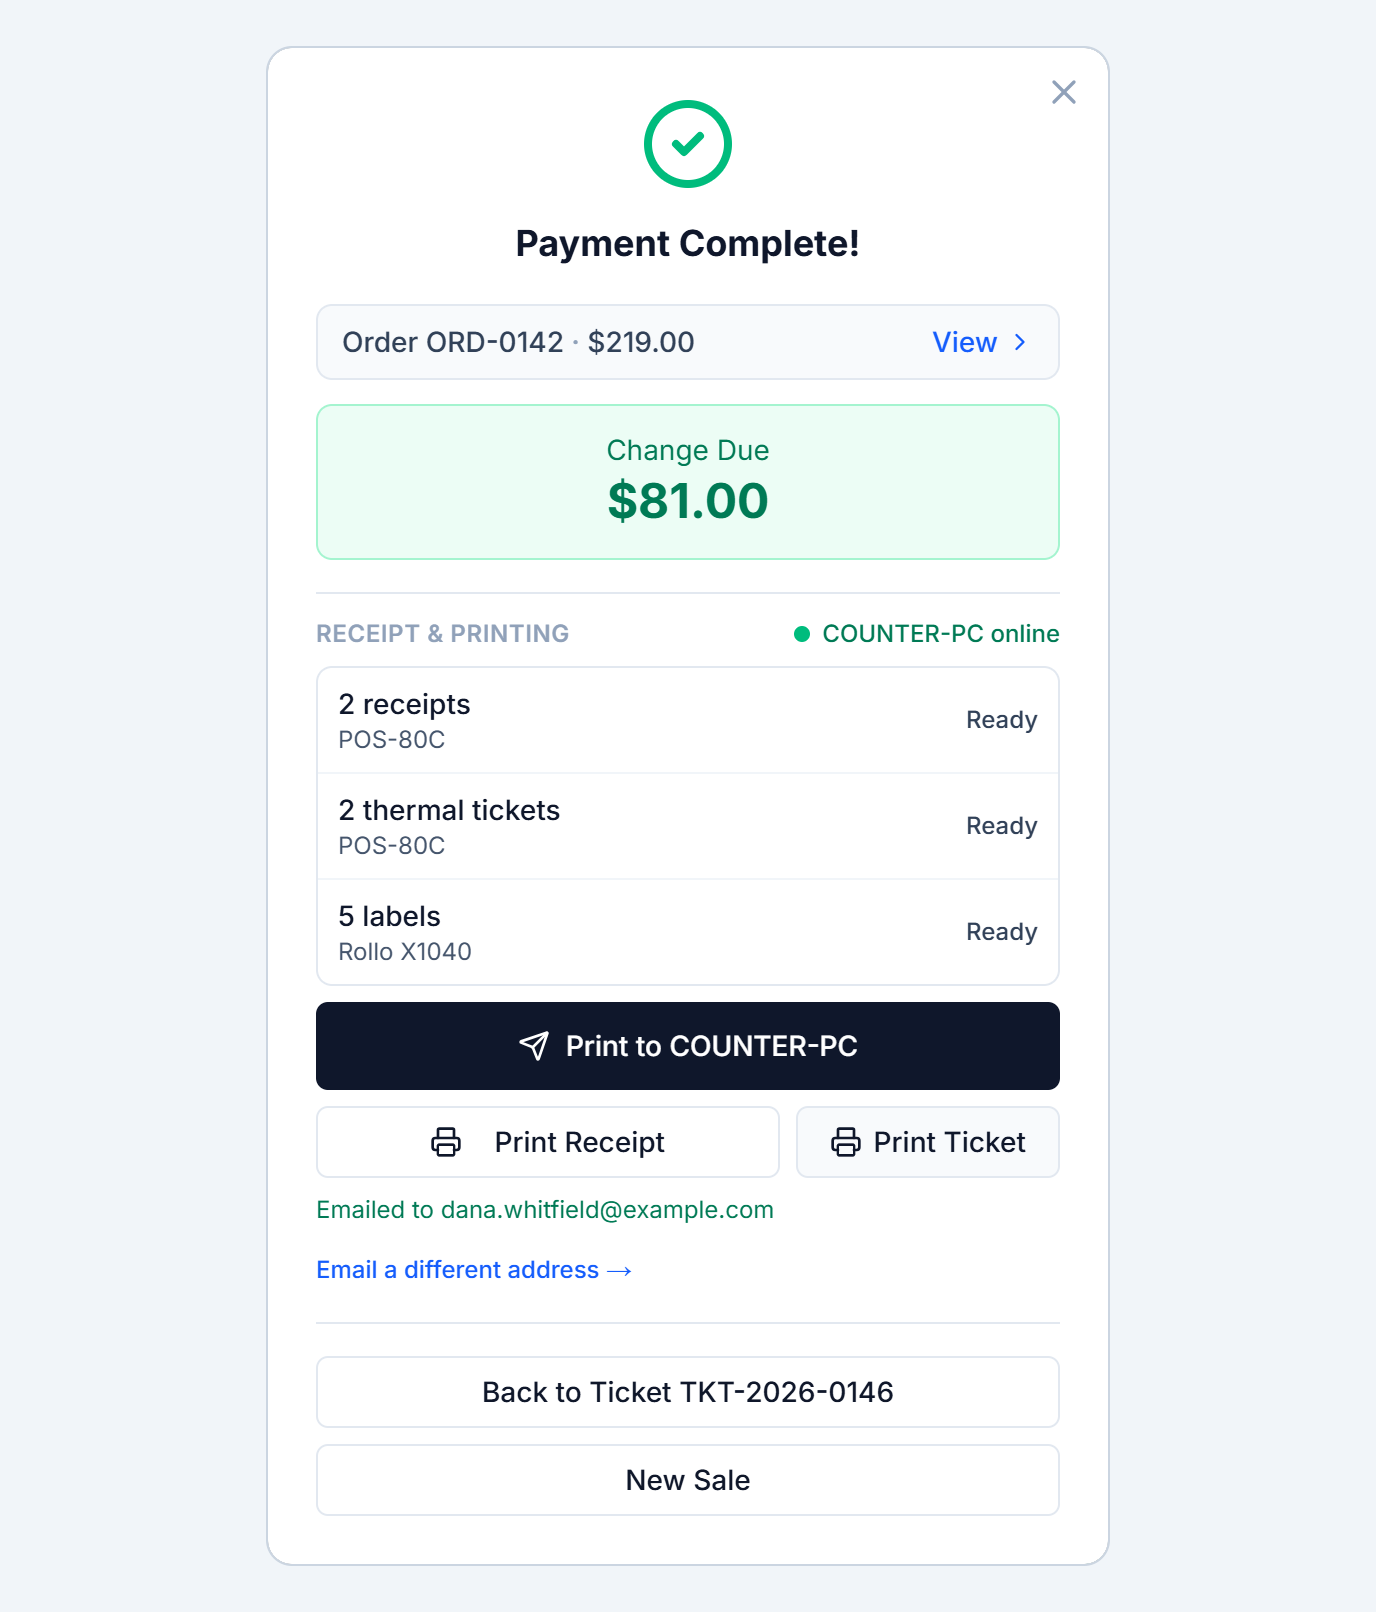
Nothing prints behind your back. When you take payment, Payment Complete lists what your rules say — 2 receipts, 2 thermal tickets, 5 labels — with one button, Print to and the name of your PC. One press sends the lot, and pressing it twice never prints twice. If you print at check-in, the same list appears when you create the ticket. Payments taken through a payment link or the customer portal never print.
If the PC is off or PrintNode can’t reach it, Spekco sends nothing and offers the usual Print Receipt and Print Ticket buttons, so you print from the browser as before. Anyone at the counter can pause automatic printing for the rest of the day from the POS.
What you need to do
It is off until you set it up. You need your own PrintNode account and the PrintNode app on your counter PC, then the API key under Settings → Integrations → PrintNode. Available on the Professional and Enterprise plans and during your trial. The setup guide under Help walks through every step, including adding network printers by IP address.
The ticket screen → Parts & Labor · Tickets → New Ticket · Tickets → Repair Templates · Settings → Tickets → General
Write down what you did, line by line
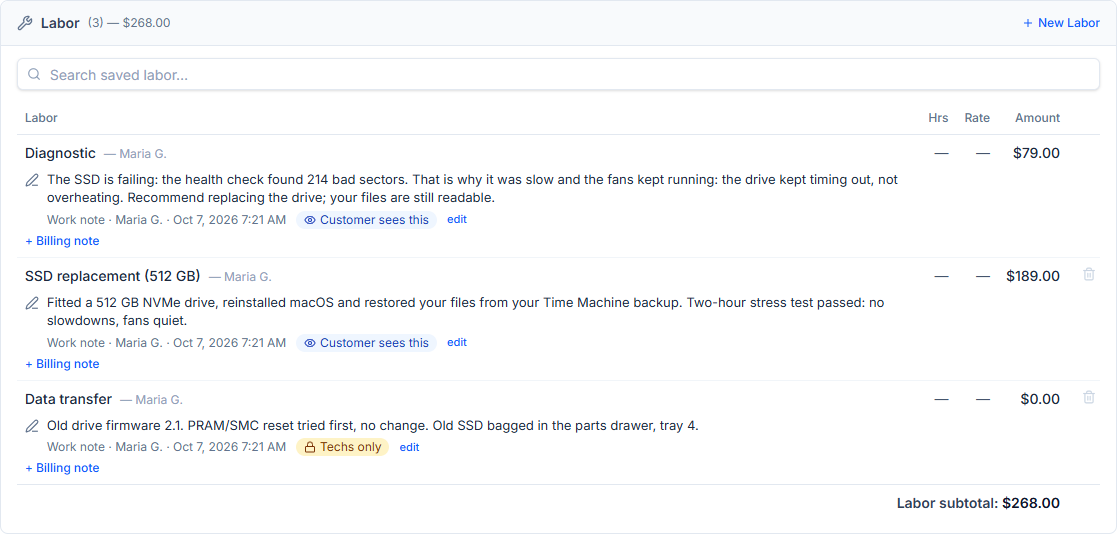
Every labor line now has a work note: what the tech actually did, in their own words, up to 1,000 characters. Press + Work note under the line, write it, and it is saved with your name and the time. Other techs see it on the ticket, and every change is recorded on the Activity tab.
You can write one while taking the ticket in, too: + Work note is on New Ticket’s labor lines as well. And a repair template can carry a standard write-up for its labor, which lands on the line when the template is applied, ready to edit.
Each note is either Techs only or Customer sees this. Notes the customer sees print as Work Notes under the line on the invoice and the estimate, at the end of every receipt, in the emails, and on the customer portal. Techs-only notes stay on the ticket — what you tried first, which drawer the old part went in.
A note written after the customer has paid still reaches them. A reprinted receipt carries it, and the paid invoice is redrawn to show the lines that were paid with their notes as they are now — billing notes included — unless part of the payment has been refunded. The earlier version stays in the invoice history.
When you finish a repair, “What fixed it?” has a Start from my work notes button, so the Knowledge Base write-up does not mean typing it all again. Work notes are searchable in the Knowledge Base too.
What you need to do
Nothing. + Work note is on every labor line, on the ticket and on New Ticket. New notes start as Techs only; to have them start as Customer sees this, change “New work notes start as” under Settings → Tickets → General.
Tickets → New Ticket → Customer · The ticket screen
Check the customer’s details before the ticket starts
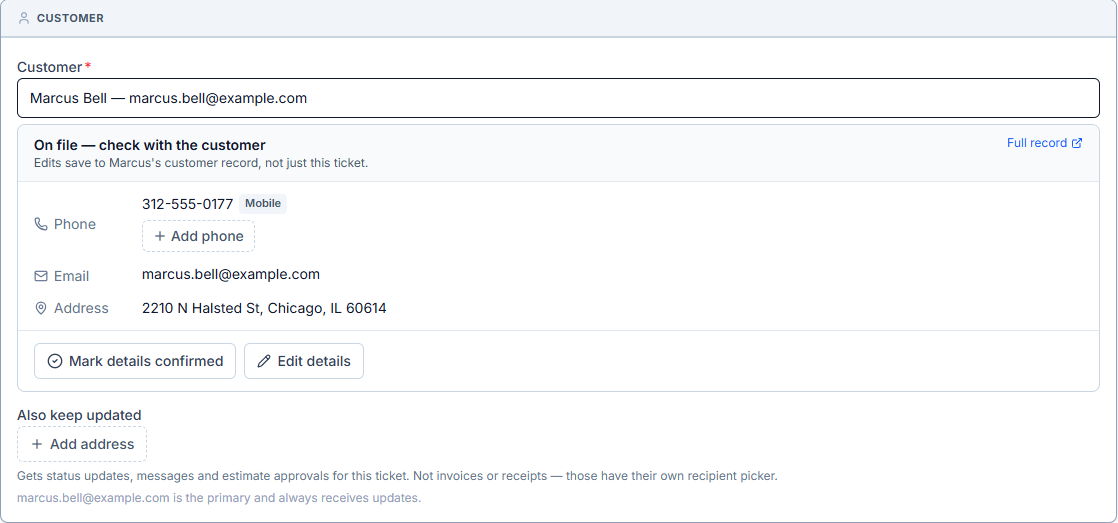
Pick an existing customer on New Ticket and Spekco now shows what is on file — every phone number, the email, the address — under “On file — check with the customer”. Ask them, then press Mark details confirmed, and the ticket’s history records that you did.
If something has changed, Edit details turns the card into the customer form right where it is. Save, and the customer record is updated without leaving the ticket or losing anything you have typed. + Add phone adds another number in place, with a label such as Work or Home, and the customer card on an existing ticket works the same way.
Customers have a Business name now, for the ones who want the repair in their company’s name. It prints on invoices, receipts, ticket slips and labels.
And at the POS: if you type a new customer’s details and go straight to payment without saving them, Spekco saves the customer for you rather than ringing the sale up to Walk-in. It only asks when it can’t.
What you need to do
Nothing. The card appears whenever you pick an existing customer on New Ticket.
The ticket screen → Print → Estimate · Billing Details
An estimate that shows what’s paid and what’s still due
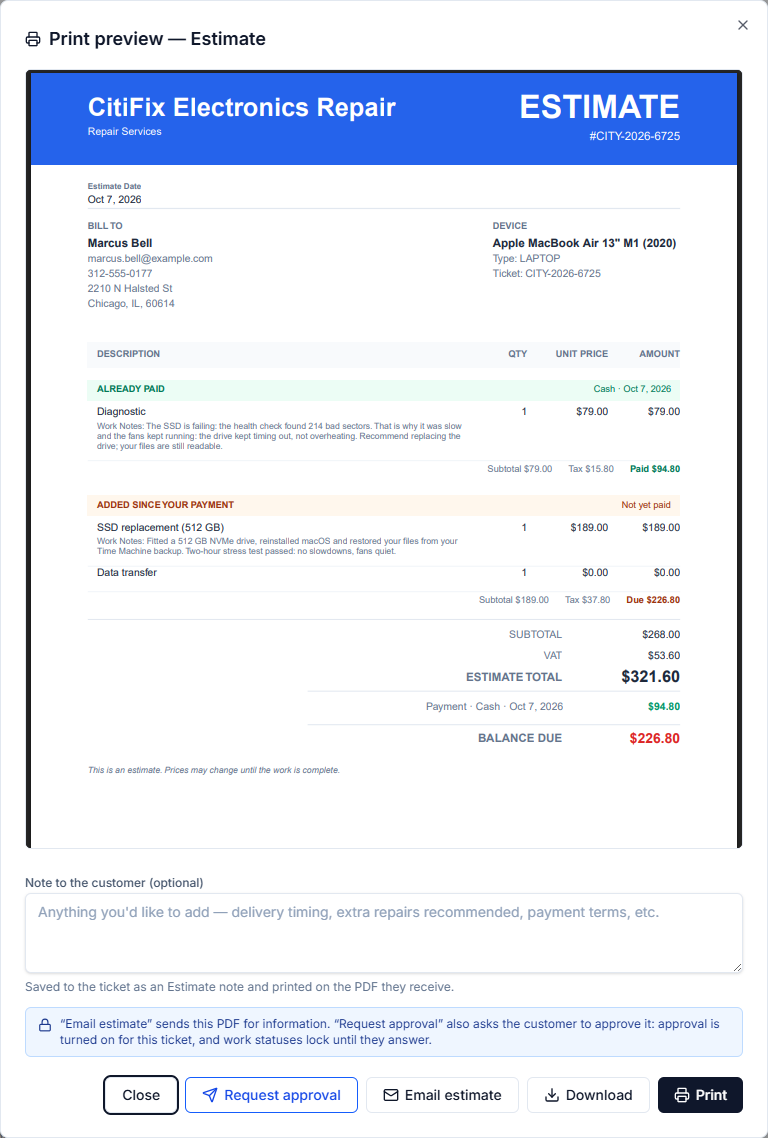
A customer who pays up front and then needs more work used to get an estimate that couldn’t tell the two apart. The estimate is now a PDF in two sections — Already paid, and Added since your payment — each with its own subtotal and tax, then the payments made and the balance due. Work notes and billing notes print under their lines.
It opens in the same preview as the invoice — from the Print menu, the Billing Details tab or the ticket header — so you see exactly what the customer will get before it goes. From there, Email estimate sends it for information, and Request approval sends it with Approve and Decline buttons and holds the work until they answer. Asking in the middle of a repair, you choose whether the ticket moves back to Awaiting Approval or keeps its status.
Spekco also notices when the price moves after the customer was told. Add a part to an approved job and Billing Details says “Price changed since the customer approved”, with the old total, the new one and the lines that changed, and offers Request re-approval or Customer agreed by phone, so an approval given over the phone from the bench is on record too. The customer’s approval page shows them what changed.
What you need to do
Nothing. Print → Estimate is on any ticket with something to bill.
POS Terminal → Return & Refund · Tickets and orders → Refunds & Returns
Refund part of a sale, not all of it
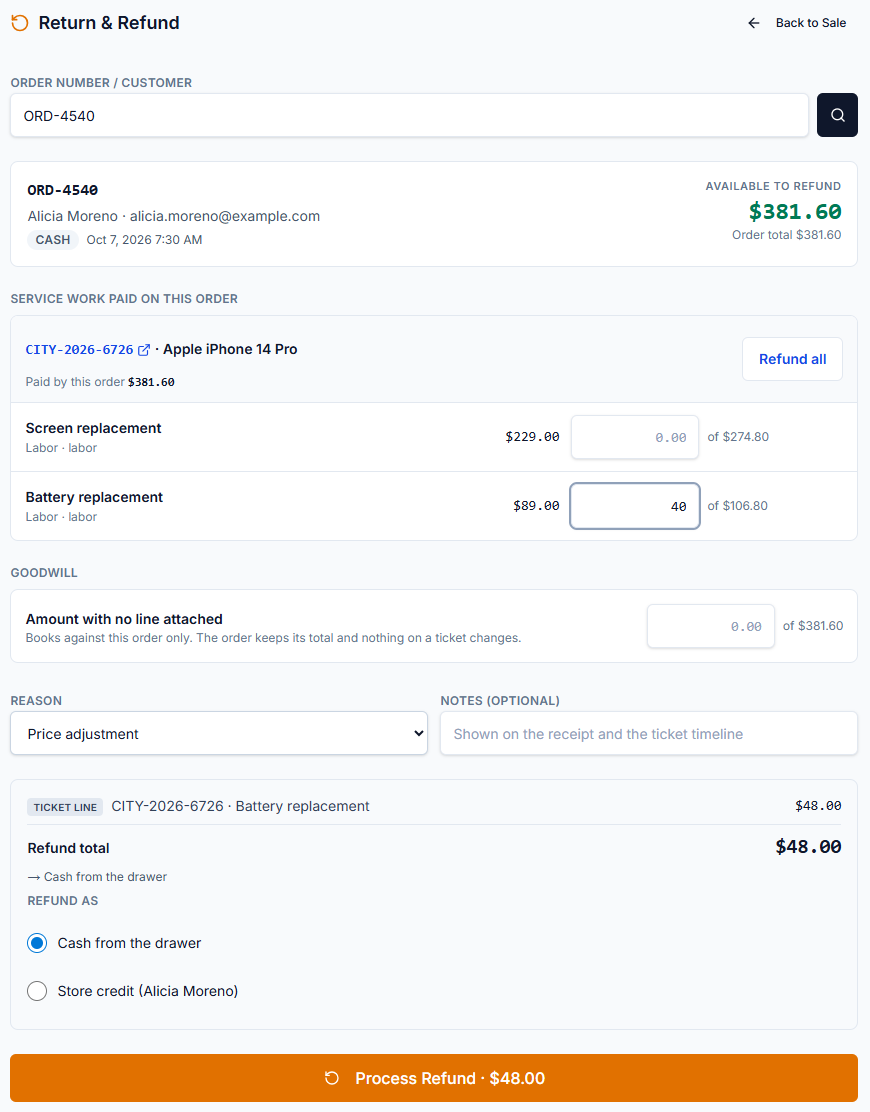
Partial refunds are here. Look an order up on the Return & Refund screen and you see everything it paid for: each product, with a quantity to return or an amount to take off while the customer keeps it, and each ticket line, with how much this order paid toward it.
Type an amount against any of them, or a goodwill amount with no line attached, pick a reason, and one Process Refund does the lot. The tax is worked out from what the order actually paid, and the same money can’t be refunded twice.
The same refund screen opens from Refunds & Returns on a ticket or an order, grouped by the order that paid. A ticket paid partly by a deposit and partly at pickup shows each order on its own, so you refund the right one. If your shop allows store credit it is offered alongside cash, and the customer can be told by email: the new Refund issued message is under Settings → Communications.
What you need to do
Nothing. Store credit appears when “Allow store credit” is on under Settings → Commerce → Returns.
Settings → Tickets → Customer updates
Customer updates that send themselves
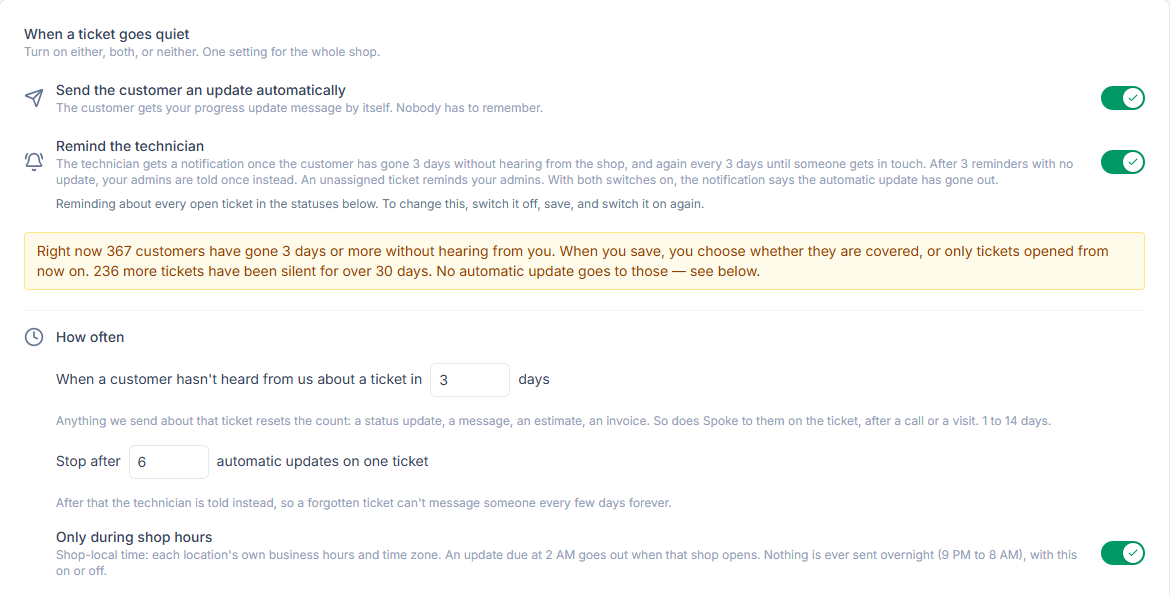
Last time, Spekco learned to notice a customer who has heard nothing for a few days and to remind the technician. Now it can send the update itself. Switch on Send the customer an update automatically, and when a ticket has been quiet for the number of days you choose, the customer gets your progress update message without anyone having to remember.
It is careful about it. Anything the shop sends about the ticket resets the count. It stops after the number of updates you set for one ticket and tells the technician instead. With Only during shop hours on, it waits for each location to open, and nothing is ever sent overnight. It never writes to a customer whose ticket is ready, invoiced or closed, or whose own message is waiting for a reply, and a ticket quiet for over 30 days goes to the technician to call rather than getting a form message.
When you switch it on, the page tells you how many customers are already waiting and asks whether to cover them, or only tickets opened from now on.
What you need to do
It is off until you switch it on: Settings → Tickets → Customer updates → Send the customer an update automatically. The wording is yours to change under Settings → Communications.
The ticket screen → Ready for Delivery · Settings → Tickets → Pickup & Delivery · Settings → Tickets → Dispatch
Pickup and delivery times your customers can choose
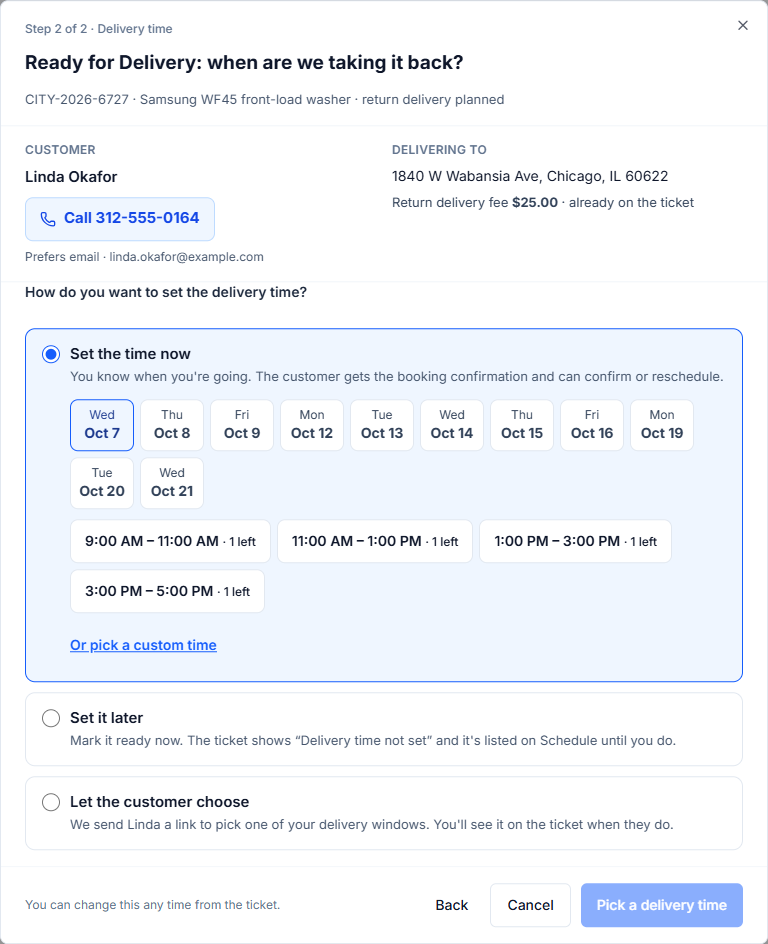
Mark a pickup ticket Ready for Delivery and Spekco now asks the question that used to get forgotten: when are we taking it back? Set the time now, and the customer gets a booking they can confirm or reschedule. Set it later, and the ticket says “Delivery time not set” until you do. Or let the customer choose, and they get a link to pick one of your delivery windows. Their phone number is on the prompt, one tap to call.
Collection works the same way now: the pickup visit gets a driver and “On my way” texts, Mark collected moves the ticket to Received, and the customer can be sent a link to choose their pickup time.
Trip fees are smarter too. For pickup and for dispatch, each location has its own service area — inside a radius or a list of ZIP or postal codes the trip is free, a reduced flat fee or per mile, and outside it a flat or per-mile rate. And customers can now book an on-site repair visit from your portal, with a switch under Settings → Tickets → Dispatch that is off until you turn it on.
What you need to do
Nothing for the prompt. It appears on any pickup ticket with a return delivery planned. To let customers choose a time, publish delivery windows under Settings → Tickets → Scheduling → Delivery.
Receipts, invoices, alerts and settings
And a few smaller things
Card details on receipts and invoices. Counter receipts and every invoice now print the card that paid — brand, last four digits, authorization code and cardholder — and a card taken at the counter reads Card (In-Person). Never the full number.
Labels from Payment Complete. Beside Print Receipt, the paid ticket’s own Print menu — thermal ticket, labels, full page — so you no longer go back to the ticket to print.
Who hears about new work. The staff alerts for new online orders, new tickets and quote requests, and customer replies each have a Who gets it page under Settings → Communications, and a new ticket can now text your team as well as email them — anyone who has ticked “Text me for new customer messages, new tickets and new online orders” on their profile.
Your date and time format. Choose how dates and times read across Spekco — on screen, on printouts and in what your customers receive — under Settings → Account → Company Info.
Your own web address. A custom domain for your shop’s website is now an add-on on the Basic and Professional plans, at $10.99 a month, and it is included in Enterprise. Set it up under Settings → Website → Custom domain.
And some fixes: thermal tickets no longer print blank paper above or get cut off below, a long terms-and-conditions footer prints under the totals instead of over them, and a line the customer has paid for can no longer be deleted from the ticket.
What you need to do
Nothing, unless you want a custom domain.